Note: I think I know what I’m doing here at the outset, so I have arrogantly titled this project “The Perfect Subwoofer”. If the result is only an improvement over my previous reference, I’ll be very happy. I also realize that perfect in one system might be anything but perfect in another. How is this possible? Bass frequencies interact with the listening room to such a great extent that the woofer & room should be considered your “bass system”. The room’s size and dimensions, construction materials, rigidity, and furnishings all affect the reproduction of bass frequencies to such a large extent that a subwoofer that is flat to 20 Hz in one room, for example, might only be able to manage 35 Hz in a different room.
This project is just getting started in the middle of February. The goal is to provide a project subwoofer that will be an excellent match for the Fostex S-168 project. I also wanted to use off-the-shelf parts so that others could reproduce these results relatively easily. First, a sealed box system was chosen to compliment the sealed S-164. This designer feels that sealed systems offer the least compromise in design, more control over the system’s interaction with the listening room, and more predictable results. Two of these systems are being built, for stereo and for greater dynamic ability (see the REL Strata review). The total project budget for two subs is $1100, which will buy one Titan, Strata, or similar assembled product.
It was decided to use a system Q of less than 0.6, which would give a more articulate, detailed sound quality. Higher Qs, such as greater than 0.8 which typically present greater impact and slam, have their places; home theater systems or live sound reinforcement, for example. A sealed enclosure with a system Q of less than 0.6 emphasizes the audio qualities of definition and low-level detail, while also allowing the driver to go a bit lower. There is a trade-off: lower Qs require larger enclosures.
Many different drivers from 10 inches to 18 inches were run through computer simulation, and based on the desire to maintain a relatively small enclosure size, selection was narrowed to a 10″ driver. Using the well-regarded REL Strata III sub, of which this designer currently owns three(!), as a model, a front firing sub configuration was chosen. How did this happen, considering the REL is down-firing? Simple. By trying various placement alternatives of the REL, it was clear that the REL sounded best laying on its side with the driver facing the listener! [The REL sounds pretty darn good standing up on its feet, too.] Using the REL this way, though, sacrifices a few Hz extension, since this position removed the slot-loading of the driver. The cabinet requirements were not as unusual as with the S-164 and a pre-built 1.72 cubic feet (48.8 liter) enclosure from Madisound was found to be ideal for this project.

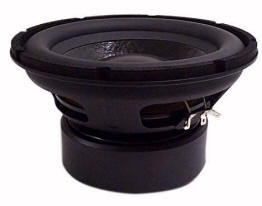
The SV-10 driver was chosen in conjunction with the final choice of enclosure to provide the target system Q. Also considered were the experiences of other DIY’ers who had used this driver. The first thing I noticed after receiving the SV-10s is that they are HEAVY, with very robust construction. I had a couple of questions after unpacking, and Brenda at Subwoofers.com was just wonderful in quickly finding the answers. Thanks again, Brenda!
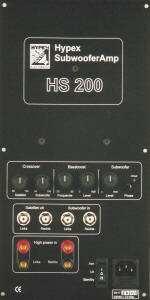
The final choice of the Hypex amps for amplification and crossover duties was due to what is called a “lock-out spec”, or a feature that competing products might not have and which is considered essential. The HS200 has a one band parametric equalizer, whose center frequency is adjustable from 20-50 Hz, and whose gain is adjustable from 0 to +6 dB. Both adjustments are available on the rear panel knobs. This is a great feature because it can help compensate for the normal roll-off of the driver below fc and f3. Without this adjustment, this subwoofer project would have required a 12″ driver and a larger enclosure to assure good in-room response in the the low 20 Hz range. But with the adjustment these subs can be tuned for high resolution, powerful and extended bass in almost any room.
Design parameters:
Sealed enclosure with a system Q of less than 0.6
Relatively small size of less than 2 cubic feet (56 liters)
Front firing design
Update: Getting parts is usually the most challenging part of any project, but the minimum number of parts needed for this one helps take away some of that challenge (or headaches). Kyle at Acoustic-Visions is great to deal with, but he is not the US importer/distributor. After a miscommunication with the order for the Hypex amps on the distributor’s side, the Hypex factory in The Netherlands graciously sent me a pair air freight! The folks at Hypex are really wonderful; their concern for customer satisfaction is second to none in my experience. Unpacking the amps, it is easy to see that they have a lot to be proud of in the very high quality manufacturing standards of their product. Build quality is comparable to medical electronics standards, which is of necessity very high as reliability and consistent performance can literally mean the difference between life and death.

Now that the final major component had arrived, it was time to “stuff the boxes”. It took all of an afternoon to cut the cabinets for the rectangle on the rear for the amps and a circular cutout on the front for the SV-10 driver, and cut several 4″ wide braces per cabinet. The braces would fit tightly from side-to-side and would be glued in place on the front, back, and top. An additional layer of 3/4″ MDF was glued and screwed to the inside front of the cabinet to allow the driver to be mounted flush with the front baffle. This required using a router and rabbeting bit. I don’t have a lot of experience using a router: a black Sharpie marker covered my mistakes – from a distance. The driver was secured with black #8-32 hex bolts and nuts with nylon locking inserts. The amps – remember a pair of these subs are being assembled – were secured with the same bolts, but used threaded inserts instead of nuts.
The subs were positioned face-to-face, the phase switch on one of the Hypex amps reversed the phase of that sub, and the Onkyo tuner was used as a source to run-in the subs for about 15 hours. The subs were then properly connected to the system using line-level interconnects. The main speakers are not in any way connected to the internal high-pass crossover of the subs; I am using the “REL philosophy” of running the mains full range and using the sub “under” the mains to supply the missing bass. The better part of a day was spent adjusting the crossover point, volume, and one-band parametric equalizer settings on the Hypex amps. I used a sine-wave function generator to run sweep tones to help set these controls at first, and it was helpful for general settings. However, I got the fastest and best results using music with acoustic bass and male voice. The setting for crossover frequency was set deliberately too high at first, and gradually reduced until the clearly audible doubling or boominess, often called “one-note bass”, disappeared. Then the sub’s volume was adjusted, usually turned down, for the proper relationship between the bass note’s fundamental tone and its harmonics.
Final voicing waited until about 200 hours of use. The high-level inputs make possible very quick and smooth integration with the main speakers, while the line level RCAs can provide more detailed, “solid state bass”. However, since the main speakers and the subs are getting different signals on the two inputs, it is difficult to get their overlapping frequency ranges to sound as one. Experimentation may yield good results, but I recommend using the high-level inputs at first. The final position with the Fostex F168 speakers (rolled of naturally at about 100 Hz) was just outside the Fostex towers and 4″ from the rear wall, with the back of the subs exactly parallel to the wall behind. Precisely setting the subs in this way helped significantly in keeping the bass tight and deep in the room.
Positioning hint: position the subs parallel to the rear wall without spikes. Measure, and then mark the front and outer edge with masking tape. Now install the spikes. Trying to get the two subs the same distance from the rear wall while adjusting the spikes to level the enclosure is very frustrating.
Update 2008: The Hypex amps have been discontinued. There are other amps on the market now that should provide similar performance. The SV10 drivers have been discontinued. The Woodstyle WS123 1.7 cubic foot, 24″h x 12″w x 12″d enclosures are also no longer available because Woodstyle is out of business.
Keep in mind these general guidelines and your subs should sound great:
- Get the sub’s input signal from the power amplifier’s speaker terminals (high level). This will make a seamless blend easier to achieve, and also make changing amplifiers simple and quick.
- Use a front firing, sealed design. Position the driver’s bottom edge within 1/2 the speaker diameter from the floor. For example, the bottom edge of a 10″ woofer should be no higher than 5″ from the floor.
- Use an amplifier with a steep low pass filter, such as 24 dB per octave.
- Watch that Q! Try to use .5 to .6 for music if the enclosure size is acceptable (lower Q = bigger box). For movies, a system Q in the .7 to .8 range should be fine.
Good luck with your subwoofer project.
